希望以每週最少一部錄制教學,完成MotionBuilder教學。
以下內容是以前設定過的課程大綱,會依錄製情況做調整。
- Lesson 1 :介面認識
- T移動 R旋轉 S縮放
- Shift+Left Click 平移畫面
- Ctrl+Shift Left Click 旋轉畫面
- Ctrl+Left Click 縮放畫面
- Ctrl+a 物件置中
- Ctrl+1~4 切面視窗面版
- Ctrl+W 樹枝圖
- Ctrl+E 透視攝影機
- Ctrl+F 前視/後視
- Ctrl+R 右視/左視
- Ctrl+T 上視/下視
- Alt+z/y 回復視窗操作
Preferences參數設定 saving/selective redraw/undo/Viewer
Asset browser
Navigator window
Layouts 自定面版
- Lesson 2 :Characterize角色綁定
- Definetion - Charater Controls
- Definetion - Navigator
- Definetion - toe/ toe base
- Definetion - Reference
- Definetion - Floor Contact
- Lesson 3 : Advanced Characterize 進階角色綁定
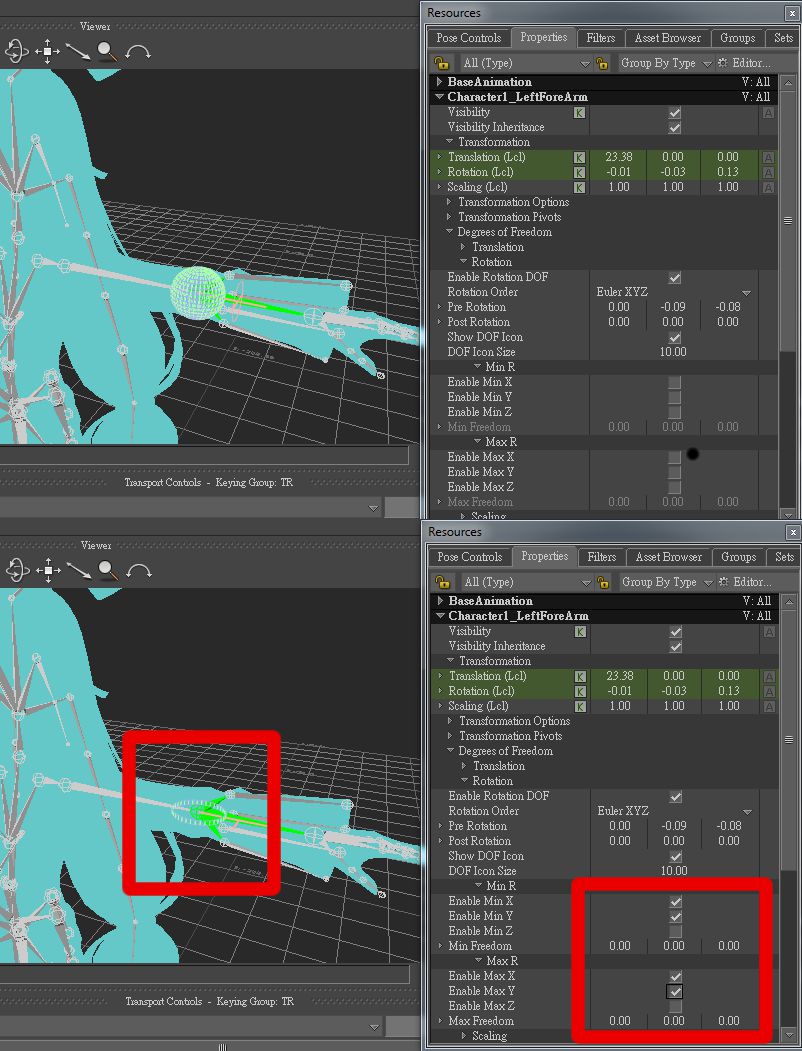
- Degrees of freedom ( DOF )
- DOF 完整說明
- Characters extension
- Create Auxiliary/effectors objects
- NameSpace
- Handles
- Constraints 的使用
- parent/Child constraint
- 3 Points constraint
- Aim constraint
- Position constraint
- rotation constraint
- relations constraints
- Relation
---------------------------------------
Damping operator
new scene
create a cube
copies 5 (ctrl+c then ctrl+v 5 times)
ctrl+w
p (parent mode)
add 10 damping operator
Other>Damping(3D)
damping effecter
Number>integer
click all damping factor connect to integer
drag all cube into relation constrain
- Lesson 4 : Character Controls 動作入門
- 控制器 Skeleton / IK/ FK 如何使用
- Key Mode
- Pin 圖釘功能
- Lesson 5: 動作進階 mocap clean
- Filters的運用 key reducing/ peak Removal/ smooth/ smooth Translation
- FCurves的運用 layer/ Time Warp (Ghost) (Tangent)
- Key controls
- pose的運用 copy/past pose
- Motion Trajectories
- time and timelines 的運用 takes mark/loop
- motion blend window
- story
- Mirror
- In place
- Lesson 6: re-target
- Lesson 7:Setup an Actor
Add Favorite path in Asset Browser
Open 2_1_Opt_Data.fbx from Asset Browser
Create an Actor from Asset Browser
Align Actor to Markers
縮放Actro Body對齊肩膀高度
調整手臂的角度
調整腿的角度
- Create a Marker set
- 頭部
- 胸部
- 腹部
- 膝蓋
- 腳掌
- 肩膀
- 手肘
- 手掌
- Rigid Bodies
- 頭部
- 胸部
- 腹部
- 大腿
- 腳掌
- 上手臂
- 手掌
Optical_Correction
Eliminating Noise
frame 255
select RSHO 5
Zoom in to see peaks in the optical data.
M-drag the Split line
Select Auto-Bezier
Eliminating Occlusion
frame 296
Eliminating Swapping
Frame427
Finalizing Optical Data
Save file as : ActorMove
- Lesson 7 :Mapping Actor to a Character
- 環境設定
- Preferences / selective Redraw
- Layouts 進階設定
- cameras 設定 camera Settings/ add new Camera/ Camera Switcher
- Lights 設定
- Shaders 設定
- Surfaces 設定